How to replace a violin bridge with a bridge jack....
This tool is a bridge jack, it's purpose is to
'jack' the violin strings upward when placed next to
the bridge so that the bridge can be temporarily
removed, or switched.
Notice how this side has a blue manufactures label,
this side goes toward the bridge on the finger-board
side of the bridge.
Also notice how the right side is lower than the left,
the same shape as your current bridge (lower on 'e'
string side).
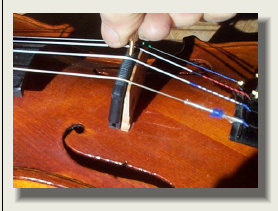
The bridge jack is inserted between the 'D' and 'A' strings
as shown with the jack adjusted to it's lowest position before
installation.
The jack is lowered through the strings..
...and then turned so the blue manufactures label is
toward the bridge.
The bridge jack is moved firmly back against the
bridge... and centered side to side so screw is centered
between center strings...
Now the adjusting screw is turned clockwise (as viewed
from above) all the while keeping the bridge and bridge
jack close together, until the bridge jack begins to lift all
four strings.
At this time, it might be wise to loosen each tuning
peg to lower tone of each string about two semi-tones.
This is to prevent over tensioning strings as they are
raised by the bridge jack.
Continue raising the strings until the downward
tension on the bridge is all taken by the bridge
jack, then...
...slide the feet of the bridge toward the tail piece and
remove the bridge.
To install the new bridge, just reverse the order, pushing
the bridge tightly against the bridge jack and centering it
into position as the screw is lowered.
Re adjust string tension and violin should be ready to play.
(8/2014)
Page LBC_28