Tailpiece Acoustical Tuning
(modified 7/2017)
(page violin_83)
...Getting the tailpiece tap tone to 198 HZ might be a struggle; until now:
This tip should get the tailpiece close to the desired frequency to allow fine tuning by the other published tips.
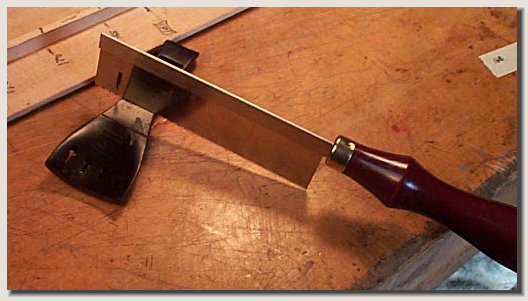
...The process involves making a series of four fine saw cuts on the under side, as shown in accompanying photos:
..Use a very fine kerf pull saw and saw an even depth straight across
the width of the tailpiece.
..To determine where saw cuts are necessary, tap along the length of the tailpiece on the top side listening for lower toned areas. When they are discovered, deepen the cut immediately under the lowtoned section.
..Continue deepening the cuts until the tone is even all along its length the the tap tone at the waist is even across the tailpiece and is equal to 198 HZ (the G below middle 'C' on the piano.
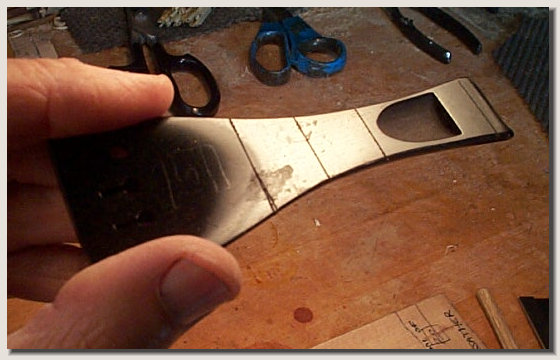
WAIST
..The four lines of cuts are clearly visible. The depth of the cuts should be only a few 32nds of an inch to increase the tailpiece tuning tap tone to the desired 198 HZ.
..This tuning of the tailpiece is completely necessary as the proper tap tone determines the power of the instrument (maximum is at 198HZ; above or below this ideal hurts violin performance).
..Any questions or comments, please feel free to contact me;
David Langsather, Salem, Oregon (Yes there is only one individual by this name in America... unless I am mistaken!)
...First I will show you a general way to raise or lower the tap tone of the violin tail piece to our 198HZ goal.
...This technique is in three parts: A,B, and C:
..The tap tone of the string bar (white is these examples) is tuned separately to 242 HZ for good instrument response.... (2017)
Part A: first we need to discover what the current tap tone of your tail piece is.
..To do this we need first to locate the area where we will tap to hear the fundamental tap tone for each string.
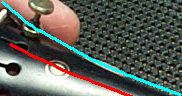
..Tap along the tailpiece listening for the overtones as you move from one end to the other. In the waist area you will discover that the overtones drop to a low point approaching from each direction. You might want to mark this line with white chalk as this is the line along which you will tap to hear the tailpiece tap tones.

_______________________________________
Part B: This is the instruction for tailpieces that are too high in tap tone (tap the white area in waist area of tail piece).
..In this technique; the whole tailpiece will be lowered toward the 198 HZ target tap tone by evenly scraping the two sides of the tail piece beginning at the waist and moving toward the back of the instrument.
..Check both sides of center line and scrape more on the side that is highest above 198 HZ. The area marked in yellow in the photo above...


_________________________________
Part C:
This is the instruction for tailpieces that are too low in tap tone (tap the white area in waist area of tail piece).
..In this technique; the whole tailpiece will be raised toward the 198 HZ target tap tone by evenly scraping the two sides of the tail piece beginning at the front of the sides and scraping toward waiste.
..Check both sides of center line and scrape more on the side that is lowest below 198 HZ. The area marked in blue in the photo above...
___________________________________________
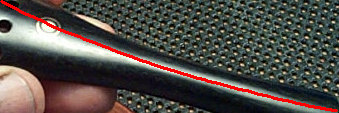
A general note here is that the tap tone should be the same all along the curved line behind each string attachment hole, through the waiste and continuing on to the back edge of the tail piece.
A general rule is to listen for any areas that are higher than the rest of the line and then to gently scrape that high-toned area down to match.
The red line in the photo above represents the line of tapping for the "A" string (for example).
___________________________________________
The reason this adjustment is so important to the success of the instrument is that this controls the power of the instrument. If different strings have different levels of powerfulness then the tailpiece is uneven in tap tone; or if the power is even but not what is expected, then this adjustment can (all by itself) make a wonderful correction for the player!
_________________________________
_________________________________
Following is an article from several years back that might be helpful is the above technique does not raise the tap tone enough ( up to 198 HZ).
I would suggest this technique to a secondary roll if at all possible....