..Opening up the instrument (by removing only the top plate) and re-graduating the plates from the inside:
...Next, determine what your plate frequency goals are, so you can work directly toward them.
...I would suggest you use (227 1/2 HZ) for the top plate and 243 HZ for the back plate based on research of many years. {The ribs will be tuned to (232.3) HZ, ~1/2 way between the two plates.}
...Also,You want the top plate to be even all over (in the graduated areas) and the bass bar to be 191.3 HZ evenly, through out its length.
...I believe a good way to explain this process is to introduce some general principles to guide you; and then to give some examples and how to deal with those particuar situations:
General principle # One:
...If you want to increase the plate frequency, overall, remove wood from the center of the plate (center bout area).
If you want to decrease the plate frequency, overall, remove wood from the two ends (upper and lower bouts).
General principle # Two:
...If you want to lower the tone of the wood in a certain area, make it thinner.
...It will be obvious that it is easy to remove wood and very difficult to put it back on again, so be careful! It is better to work slowly and approach your goal frequency in small steps than to try and do it all at once.
General guideline # Three:
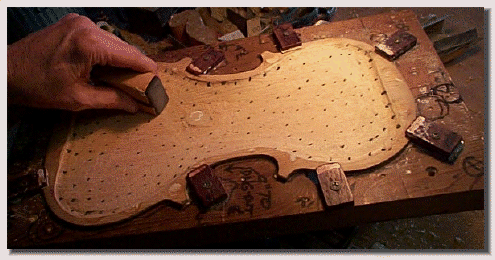
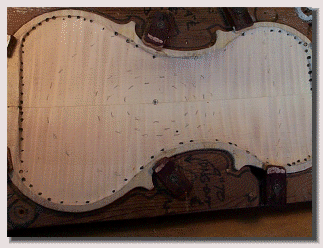
...The edges thickness is to be maintianed (usually 4 to 4 1/2mm thick), and the plate wood across the ends of the plates inside should not be removed (leave it the same height as the edges for strength; as shown in photo below.)
Protect these areas so no material is removed here...
(Top plate shown before "ff" holes were cut out); graduate toop plate to an even 2.6mm thickness.
The raised sound post pad (tune to match the back plate frequency.) About the size of a quarter. Currently I would suggest eliminating this pad on the top plate.
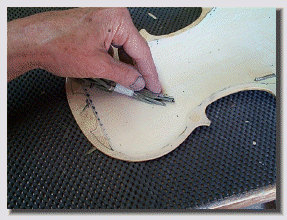
Areas to thin to increase the overall tone of the plate (by sanding or scraping inside surfaces); if only one end needs to have its tap tone frequency increased, then just scrape the center bout from the center toward the end that needs to be raised, beginning in the center of the instrument.
GTX105243


General Principle # Four:
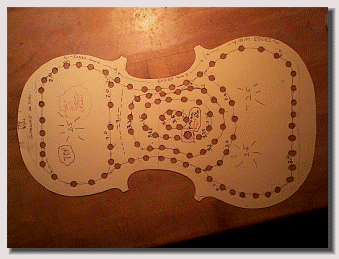
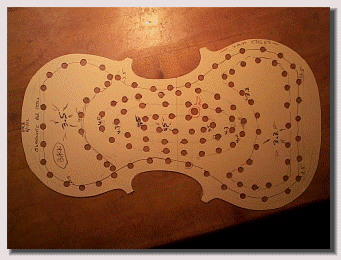
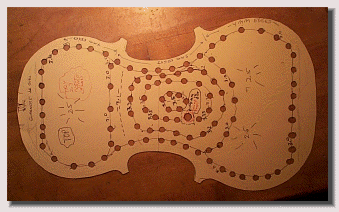
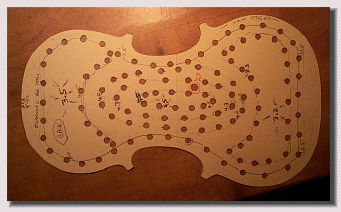
...Complete the graduation scheme on the plate you are working on, (in my case as shown in the above photo, I continue working until all the black spots just disappear). Then we are ready to make our adjustments towards our goal frequency. Remember the adjustments we make now will be 'permanent'.
..
...With my Opus # 20 violin, I exposed the plate wood for eleven days (24 hours per day) in my U.V. light box with the plates hung vertically {and a pan of water in the bottom to keep the wood from drying out excessively}(ribs glued to the back plate but the top plate not yet glued on, so the U.V. light was absorbed equally by inside and outside surfaces) until the wood had darkened to a pleasant 'suntan' color.
...You might consider an inside ground application now. The old master violin makers applied some substance that left a clear waxy surface that protected the wood from darkening even after hundreds of years. This inside surfaces must not be varnished, as this will hurt the instruments performance. I would suggest two coats of propolis application, followed by good two applications of dutch rush to these inside surfaces for best acoustical properties. If you use Propolis inside, be sure to also use it on the ourside as well. (see other articles).
...Then, after the body was glued together (after 1 1/2 days in a desicant drying bag to reduce plate moisture.. see separate article)
...This would be the time to apply any wood color stain to the body if you are going to. After this, apply any ground preparations desired. See separate articles on 'varnish ground'. [Including using Fuller's Earth' in first layers of varnish.}
...For varnish tips see separate articles on 'Varnish'.
...The next page will show examples of how the plate wood might be adjusted once the plate graduation is completed as outlined above. Because wood is variable in tone, it needs to be 'micro-adjusted' to our goal frequencies. This is probably why the more famous violins are not exactly uniform in plate thickness in different areas, there is considerable variation in the best violins and I suggest that it is because the inside of the plates were adjusted to get the goal of an even tone for the plates, rather than an exactly even wood thickness (graduation).
top plate
back plate
top plate
back plate
(revised 7/2024)
Page AA_27
..Completed inside surface of the back plate of my Opus # 24 violin. The perimeter depth graduation marks show because there needs to be a curve here instead of a sharp edge, to prevent future cracks.
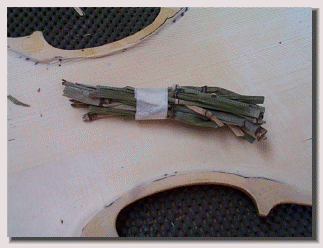
.A bundle of dutch rush ready for circular scrubbing into the wood surface of the interior; do this twice.
..Push and use a circular motion. After doing the entire surface, go back and do it one more time for maximum effect. Notice the smooth and waxy feel to the wood surface.
..Also note the acoustical effect of tap tones on areas done and undone areas; very impressive improvement... Also not how the effect goes through to the outside wood surfaces, the same as the effect on the inside surfaces. This appears to be a permanent change in the sound characteristics of the violin wood plates.