Plate graduation adjustment to get even tone all over plates...
...Since we will probably need to shift plate fequencies around at this stage to get the plate tone even all over; I will offer some suggestions to do this.
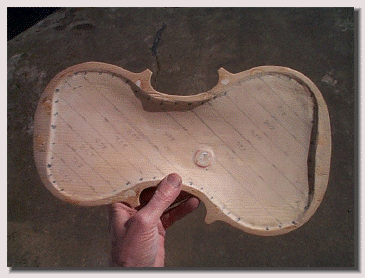
... For a top plate, I recommend that you tune the plate to the desired 213 HZ Tap Tone before you cut out the "ff" holes. cutting out the sound holes will not change the actual frequency but it will change the overtones; it is easier to tune the plates now. Notice the sound post pad which was left slightly thicker.
...I now just make plate thickness 2.6mm all over and eliminate this pad entirely.
...You will notice that here I have drawn on the Vigdorchik tuning strips (in pencil) but this is for a final adjustment and/or check of the evenness of the plate.
...Now suppose that just the outlined area is too high in tone compared to the rest of the plate which is at the frequency that we want it to be at.
...In this case, tap the too high area with your special tapping pencil and hear where it is the highest frequency. Beginning there, gently sand or scrape this area widening out as this area is lowered until the entire area matches the rest of the plate
...Now that the plate is relatively even in tone (using a knuckel tap or a brisk finger tap); we can use the Vigdorchik method for fine tuning and checking our accuracy. Draw on the diagonal lines as shown here. Now tap along the center line of each strip from one border to the other. The tone should remain constant all across. If there are areas that are higher than others we want to lower those higher toned areas by lightly scraping or sanding until they match all across the drawn tone strip.
Two examples of lines of even tone along center of drawn strips:
...The rule for adjustment is that the entire strip (that is the center of the strip except the wide middle strip which is made all even) is raised or lowered by scraping or sanding just the outer edge of the strip as shown. One side to raise the tone and the opposite to lower it. Just the least little bit of wood removal makes the necessary adjustment (perhaps one to three grams for the entire plate).
Scrape near this edge to raise the strip tone.
Scrape near this edge to lower the strip tone
...You will notice that the end of the strip nearest the center bout is the side which is lightly sanded/ scraped to raise the tone of that strip.
The blue area shows how much area is scraped to actually adjust a strip (in this case to lower the strip)..
modified 10/2020
Page AA_30