A 45 degree top and back edge bevel is sanded all around the perimeters of the plates on the exterior side using various shaped sanding sticks.
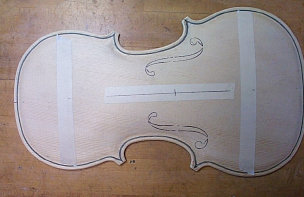
Now the top plate detail work is continued. We begin to mark out the 'ff' holes. Center lines are measured for the upper and lower bouts and marked on masking tape applied in these areas. A center line is drawn, again onto (blue) masking tape lightly applied.
Remember: when ever you remove tape from a wood surface, do so by removing tape in the direction that will hold the wood grain down. Removing the tape so that it lifts the grain can often pull the wood fibers off the surface of the soft spruce wood used in the top plate.
A very accurate cut out pattern (usually copied from a famous violin maker) is positioned on the centerline and held down while the ourline is traced with a sharp pencil or pen (I prefer a fine ball point pen as it is more durable... we do not want this line to be rubbed off!).
Several views of these layout lines on the top plate.
Placement of the 'ff' holes is critical for proper sound and resonance.
If placed too far apart they will hurt the power and tone. (Usually the inner holes are spaced apart the width of the bridge). The inclination of 'ff' holes, position of the 'ff' holes along the centerline and size of openings also affect sound.
Modified 9/2017
Page O16C_46
7.625" down from front plate edge to inner sound hole notch.