Page : AA-44
Modified 7/2024)
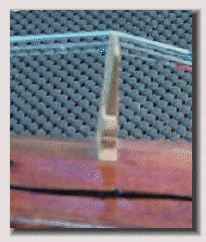
...Lower the string grooves in the bridge (using a jewlers tapered round file, or a sharp knife) until the distance from the fingerboard end to the bottom of the strings are (for synthetic strings):
String : *distance in inches: *distance in mm:
G 0.197" 5 mm
D 0.170" 4.3mm
A 0.146" 3.7mm
E 0.118" 3.0mm
String height at nut:
G 0.018" 0.46mm
D 0.015" 0.38mm
A 0.014" 0.36mm
E 0.011" 0.28mm
*...These heights are when the instrument is strung up to concert pitch; because as the strings are tensioned, the neck deflects and the fingerboard end is lowered; so subtract about 0.010" without tension.
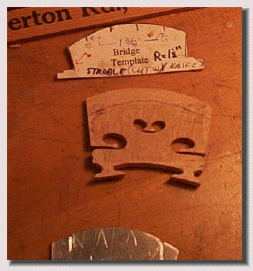
..Our next task is to thin the thickness of the bridge bank (leaving the back surface [toward the tailpiece] alone....
...Please notice that the back side of the Bridge is Perpendicular to the Top Plate. This is the permanent tuned position for any Violin.
..Also notice that the feet are the same (maximum) thickness as the lower section of the Bridge (above the arch between the feet).
..As the shape rises, there is a gradual curve towards the string contact line which is only about 0.064" wide evenly across the Bridge top surface.
..Viewed from above, the Bridge also smoothly curves toward the sides as well.
..When completely rough tuned, there will be an even all over, Front surface Tap tone of 227.5 HZ {just like the violin top plate}.
..There will also be an even Horizontal tap tone on both sides of (232.3) HZ. {Just like the violin ribs should have.}
..And at the same time the even all across the top surface, downward Tap Tone of 242 HZ. {Just like the back plate of the violin.}
..Work slowly removing excess wood from the bridge face (toward the fingerboard,)where above 232.3 HZ tap tone, until even all over.
..I find this easiest to do with a wood sanding stick about 1 1/2" wide, taking long, light strokes, the bridge being supported on a wood block about the width of the bridge blank.
..Here are the three Tap Tone References for you to compare to...[Just click on the boxes to hear them...]
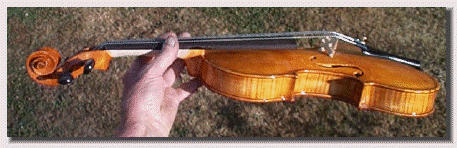
..At this point you should be ready to install the bridge on the violin and:
** Install strings and sound post.
**Tension strings (tune up) and check string heights at Nut and end of the fingerboard. Reset the Bridge string heights as necessary to get proper string above the end of the fingerboard heights.
** Check to see that the Nut, Tap Tone is set at (227 1/2) HZ and Tailpiece and Tailpiece String Bar are both set at: 227.5 HZ
** On next page we will do initial bridge tuning for rich 'plucked string tone'...
Front Bridge Tap Tone == 227.5 HZ
Side Bridge Tap Tone == 232.3 HZ
Top Down, Bridge Tap Tone == 242 HZ